| Date |
Description |
| Apr-2009 |
My heavens - it's 2009 and I've still not launched. Fortunately I
now have a trailer thanks to Revenue Canada and my local trailer manufacturer Van Eyles Trailers Sadly, immediately after buying
the trailer, it rained and snowed for a week. With the help of my son Trueman, we
hoisted the boat off of the dolly and up on to the trailer. Several adjustments were
required:
 | Raise the bunks up so that the keel would clear the trailer (might have to lower them a
bit though - not sure) |
| Adjust the winch (either have to lower the boat or raise the winch |
With the boat on the trailer, I couldn't resist "practicing" and
"testing" - and taking it for a tour of the countryside. I've been assured
that with such a light boat even if it is a fairly large trailer, that I shouldn't have
any problems. I did try the steepest hills I could find and the car had no problems
with the load. Retrieving from the launch ramp still fills me with terror though.
 |
 |
| Peeking out the garage. If I were to do this again,
I'll need a bigger shed. |
Seeing daylight and sensing adventure |
 |
 |
| Winched up - either the winch needs to move up, or the
boat down |
Resting on the bow roller |
 |
| It pulls nicely - but looks like a mis-match |
 |
 |
| Quite a sight if you see it coming down the road |
Car looks bigger from this angle |
 |
 |
| Most of the boat is resting on the bunks. |
The starboard bunk was slightly loose and shifted as I
cruised. It's now secure, but I think I'll install a mid-ships keel roller to hold
most of the weight and a channel to guide the boat on and off. |
|
| April 2009 |
Now that I'm motivated again, I've gone out and spent money on what is
needed for a keel roller and the running rigging of the boat. Very little is in the
way of my launch. |
| Early May 2009 |
Pick up running rigging bits and pieces. I've decided to try lacing
the mainsail on to the mast rather than using hoops. |
| 10-May-2009 |
Rough-cut out the taffrail. My original plan was to try to cut it
to shape but it turns out that I would have needed to start on a 4X6 so I found a 2X6 that
had been used earlier for one of the framing pieces and was able to cut out the aft deck
curve on it. It needs to be bent to the deck so I have it outside on the boat with
some weights on it and am hoping that a bit of time, rain, and gravity will do the trick
for me. If not, I may have to steam it. Fortunately the 2X6 yeilded 2 pieces
so I should be able to try again if I screw up the first piece. I also picked up 10 pool
noodles for behind the seat floatation. According to my math, the 2 1/2"
diamter, 49 inch long pool noodles with a 1/2" hole in the middle should each provide
(3.14*((2.5/12)/2)2*(49/12))*60lbs/ft3 - (3.14*((.5/12)/2)2*(49/12))*60lbs/ft3
= 8 lbs of floatation based on 1 cubic foot of water weighing roughly 60 lbs. My 10
noodles then give me roughly 80lbs of floatation. |
| 15-May-2009 - 20-May-2009 |
Move the boat and trailer back into the garage to do some work on the
trailer. Using the stern eye and bow eye (and some helpful swear words) hoist the
boat up off the trailer and then slide the trailer out. Things done include:
| Install center keel roller |
| Install keel guides |
| Move axle forward 3 1/2" reducing tongue weight from 140 to 120lbs |
| Slap a coat of blue Tremclas paint on the exposed wood. |
After putting the boat back on the trailer I see that the bow roller no longer makes
contact, oh well, it should be fine (I hope). It's only up by about 1/4" so it
may settle. The keel guides look like they'll work just fine. To protect the
keel from the angle iron, I covered it with some old outdoor carpet which (much to my
surprise) had been home to a number of bees.
After some discussion with the helpful people online at Messing-About.com, I looked at the trailer again.
It turns out that if I pull the bow down so that it rests on the front roller as
well, the hull sits just barely above the bunks. This should be the
"ideal" spot making for easiest launch/retrieval as well as being easier on the
hull bottom when sitting for long periods of time.
 |
 |
| The installed rollers and keel guide. |
Bow roller |
 |
 |
| Mid-ships roller (no stern roller) |
U-Bolted on with angle iron for support. Hopfully it
will be sturdy enough. The keel guids at the top were lag-bolted at the ends which
should add a certain amount of strength as well. |
 |
 |
| Sitting just above the roller - see notes above |
120lbs tongue weight - not too much, not too little.
The minimum would probably be around 70lbs as 10% of the trailer gross weight, but
I think that might be too little and I also have not taken the trailer to the weigh scales
to be sure. |
 |
| Keel guides - guiding the keel. They are
covered with outdoor carpet to protect the keel from the sharp angle iron edges. |
With the help of Trueman, lay-out and cut out the main-sail and much of the jib.
We ran out of double-sided carpet tape so I'll have to pick up more to finish. I'm
also concerned that the inexpensive tarp that I got is too light. Hopefully it will
at least last the season. Differing from the plans (as usual) I'll use double-sided
carpet tape around the edges of the sail, folding it over with some light cord in the seam
for added strength.

Pick up a sheet of 2'X8'X2" foam and cut it to fit into the "wasted"
space in the forepeak that couldn't be used for storage. According to my math
(2'X8'X(2/12)')X60lb/ft3 = 160lbs of floatation. My floatation should be adequate
for any forseeable circumstances (I hope). |
| 30-May-2009 |
Use some "boat in a can" - aka body filler to smooth out some
of the crappy fiberglassing work that I did, especially at the bow and sides.
Surprisingly, my wood rasp turned out to be an excellent tool to fair the hull - worked
much better than the surform in this particular application. Then - cut out roughly 80
1" X 3/4" X 2" long blocks out of some spruce which were nailed and glued
to the hull to act as spacers for the toe-rail. A few days later I went to cut the
actual toe rails out of what I thought was more scrap spruce, but my stash was all used
up. Fortunately I have lots of 2X2 dry, straight-grained cedar. It should work
OK for toe rails. |
| 6-Jun-2009 |
Attach the toe-rails using Titebond. Normally I would have used PL
Premium but the clean-up would have been pain in between the spacer blocks. I have
finally defeated the mind-set that says that everything has to be fastened with screws and
have used finishing nails. They worked quite well - no problems with splitting and
once covered with paint, should stay in place for years.
 |
 |
Boat In A Can
It's actually smoother than it looks |
Quite happy with how the cedar toe rails turned out. |
|
| to 27-Jun-2009 |
Painting, waiting for the paint to cure, standing on uncured paint and
repainting, touching up where the wrong colour splashed somewhere. And at last -
re-attaching the portlights, chain plates, re-setting the steering.
So very close to launch but it moves away ahead of me. 27-Jun was the original
launch date, but that's been moved to 4-Jul and might be moved again. The forecast
is for rain for much of this week which keeps me from setting up the running rigging.
To do still:
- Finish the sails
- Make a boom crutch - figured out how to do it without a taffrail to mount it on
- Set up running rigging
- Set up cleats for running rigging
- Go sailing
 |
 |
| Stbd Profile - the bow sprit is up against the garage |
Port profile - purty ain't she |
 |
 |
| The forepeak is stuffed with glued in styrofoam. The
orange string is for fishing the bow light. The scrap pieces will be put in a bag in
the transom |
Wheel is attached. The paint on the hatches isn't
quite cured so I' leaving them open for now. To hold them down, I've put a hasp on
them. |
 |
 |
| Rudder box |
Steering is attached - much easier through the hatch.
Pool noodles in the bottom of the shot. |
 |
 |
| Chain plates, portlights, and grab rails re-attached. |
An extra bolt was added to the chain plates and special
wider blocks to hold them in place. Between the blocks you can see the bump where
the two pieces of the toe rail were butted up on top of a regular spacer block. |
|
| 1-Jul-2009 |
Canada Day!
With it being a rainy-dreary kind of day I worked on the jobs I was putting off for
such a day. The fact that I've had lots and lots of these days in the recent past
doesn't signify.
The sails are now taped with carpet tape and tarp repair tape was used for the stress
lines. I placed a small nylon string at the edge of the tape to provide a bit of
extra strength - I noticed that manufactured tarps have such a string and figured they
must know what they're doing. I haven't put the grommets in but that is a pretty
fast operation and hopefully will do that Saturday.
I also realized that I didn't have a jib-boom so I salvaged the mast from my OSS and used that. It's green but that might change on
Saturday as well. |
| 4,5-Jul-2009 |
Well - I've given up on a specific launch date - this thing just keeps
dragging along. I have at least another few days of work it would seem. I did get
my boom crutch made which is necessary to haul the boat with the mast down - otherwise it
would bang the heck out of the stern of the boat and the wheel. I also installed the
mast and started rigging. I found out that several of the cheap pulleys that I had
bought had a sharp bit of metal where two parts of the casting for the shell came
together. Crappy quality control. After tearing up some line I un-reeved
things and started filing.
 |
 |
| The back of the boom crutch. It's plywood stiffened
with some 1X. It slides between the wheel and the front of the lazrette. The
actual weight sits on the transom. |
Boom crutch installed - by good luck it just misses the
blocks for the throat halyards. This shows the cockpit cover sitting in place as
well - I expect this to be the usual way it will be set for storage and transport. |
 |
 |
| Mast is up and the standing rigging is re-tuned. I
think it still needs a bit of work though - I may have left the turnbuckles turned out too
far. |
Oarlocks installed. I bolted them to the toe-rail
using a type of T-Nut/threaded inserts that grips into the wood keeping it from splitting.
They seem very solid. The oarlocks were too small for my oars so I replaced
the pin with a section of chain to hold the oars in place. |
|
| to 26-Jul-2009 |
The weather has not been cooperating at all. I've been reluctant to
uncover the boat because it want to have a heavy rain every few minutes. I
"did" manage to get some things accomplished though.
| The boom is attached and the mainsail lashed. The soft nylon line I've used for
the mast lashing catches though so I'm going to change my lashing method and also go to a
polyester 3 strand line. |
| I picked up some baler belt (marvelous stuff) and mounted it to cover the gap between
the stern post and rudder box. It seems to even have taken paint well. |
| I've changed out the shackles at the top of the mast for quick-links and adjusted the
port side shroud length. |
| I also had to adjust my boom crutch to make room for the lines and eyebolts and to
account for the twist in my boom. |
| Attached the carabiners I'm using for jib hanks to the jib. |
| Finally, I made a sling for the rudder during transport out of some strapping I had
laying around. |
 |
 |
| Looks pretty good |
The peak angle looks OK too. |
 |
| Masthead mess. I added an extra
quick-link to one of the peak halyard blocks to try to keep them from binding with each
other. I also had to make some room in the boom crutch for the lines to fit in too.
At the top left you can see the plastic sheeting that covers the boat. |
|
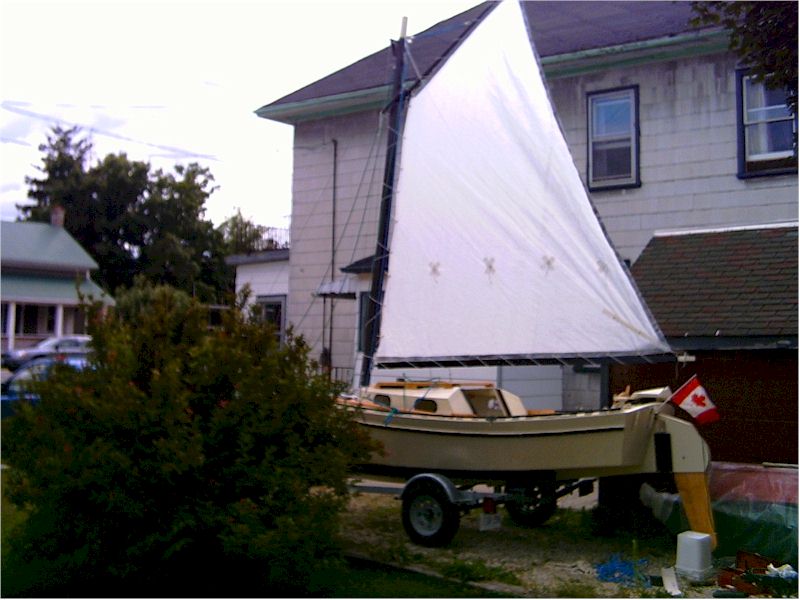
| to 2-Aug-2009 |
Rain and life has gotten in the way of finishing but finished(ish) I am
at last. The snap clips worked great for the jib but I changed out the mainsail lacing
going with a twisted polyester rope that hopefully will be less likely to hang up. I
also at the suggestion of others who have a laced sail, changed the pattern used so that
there are less loops around the mast.
 |
 |
| Hooked up and ready to go |
I'm not happy with this link - it tends to jam but I
wanted something I could take apart. |
 |
 |
| Everything furled. I even managed to get the shrouds
up so that the turnbuckles won't bang as I drive along. |
Some strap to hold the rudder up for transport. The
gasket between the stern-post and the rudder is made of baler-belt from the farm supply
store. Amazingly tough flexible stuff. |
 |
I found time to put a piece of pipe to hold up
the blocks for the jib and main sheets. I also added some heavy cleats at the stern.
Fortunately I have a solid piece of wood underneath to attach them with. They
should be solid.Now - on to the launch! (I hope)
|
|